
Welcome to Storyline Tips & Tricks, where we are always on the lookout for ways to spice up our work in Articulate Storyline. In this session we will explore how to create a Choose Your Own Adventure style scenario.
Scenarios help connect the learner with real life applications of the material that they are studying. You can create a detailed branching scenario for your entire training or come up with short one or two question scenarios to take the place of standard multiple choice. No matter how you incorporate them, scenarios are guaranteed to keep your learners engaged with the material.
Start with a Plan
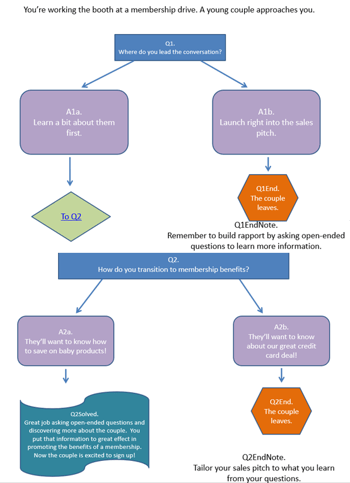
It’s much easier to lay out your scenario if you plan it before you start creating your slides. Write your script and pick your decision points. You can use a program like PowerPoint or draw your storyboard with pen and paper – whatever works best for you! Here’s an example Microsoft Visio diagram of a short two-question scenario in which the learner is attempting to sell a retail membership to new customers.

Note how the diagram is color and shape coded to make it easier to translate into Storyline. A blue box denotes a question slide, light purple boxes are answers, the orange stop sign is a “bad” ending and the teal flag is the “good ending.” If the scenario had more questions and choices, you would see more orange stop signs as each of the questions led to either a stopping point or the next question in turn, but there would still only be one teal flag at the very end.
When you are coming up with the layout for your scenario, you will need to decide whether to include feedback for each decision point or wait until the end of the scenario. Do you want your learner to play through the entire thing as they would a real encounter, or be able to start over as soon as they make a mistake? Does failure mean they start over from the beginning or that they go back to where they went off track?
Bring Your Plan to Life
Once you have your scenario all planned out, you will want to collect your media to bring it to life. This might include recording audio for the various characters or creating audio using text-to-speech programs. You will need to pick out backgrounds as well as characters for your scenarios. You can do anything from recording actual video with actors to drawing comic book style characters to using the built in Storyline characters and their various expressions and poses. For this example, we used the Storyline characters and an iStock background.
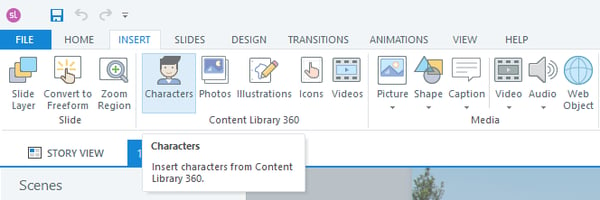
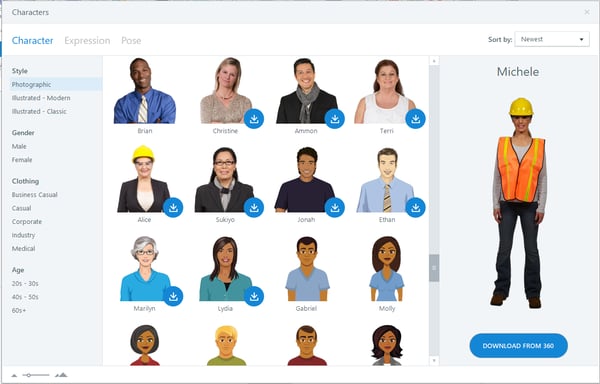
You can access the Storyline library of characters from the main toolbar, as shown in the screenshot above. Storyline offers a variety of both realistic and cartoon style characters of all ages and styles. You will want to select your characters and have a few different poses for them so that they can react to the dialogue in your scenario. Once you have all your media picked out, it’s time to start bringing it all together in Storyline.
Weaving It All Together
Use your diagram as a guide when creating the slides for your scenario. Take each section and time your character poses, audio and decision points accordingly. Update the background if the characters move from one location to another. Use a variety of poses for your characters to simulate their reactions to your dialogue. In the example below, you can see how the characters change expressions and poses leading up to the first decision point.


Script your characters’ reactions to the different responses. In this next example, you can see how the expressions change drastically depending on whether the learner picked the correct or incorrect choice:


You have a lot of flexibility in creating your characters’ dialogue and reactions. Have fun and be creative, but also remember to keep things realistic and not too over the top. You want to simulate a real-life scenario that your learner might encounter.
A Complete Cycle
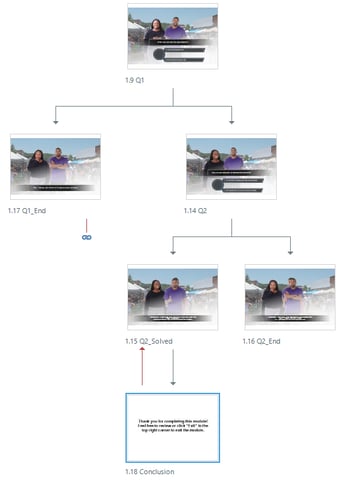
Once you have finished putting together all the pieces of your scenario, you should have a group of Storyline slides that closely resembles your initial diagram:
Your story is now complete! Scenarios might take a little more work to setup than a standard multiple-choice question, but the reward they bring in terms of learner engagement is worth the effort. They are also fun to make! We have a lot of experience at creating scenarios for our clients. If you’d like to look at some examples, check out our portfolio site. Or if you are looking for more information about working in Storyline, check out some of our other blogs about working with the navigation, time savers, and other tips.
Stay tuned for the next edition of Storyline Tips & Tricks!
